A bonded chemical anchor transfers force through a tested combination of threaded rod, cured resin and surrounding concrete, so secure fixing depends on more than selecting a large bolt. By the end, you will know how to distinguish the system from other fixing methods, assess the concrete and installation conditions, specify the anchor correctly and control the work on site.
Key takeaways
- Match resin and anchor design to load, concrete condition and installation environment.
- Inspect concrete for cracks, reinforcement, edge distances and drilling restrictions before fixing.
- Clean the hole precisely; dust, water and incorrect curing conditions weaken the bond.
- Verify embedment, resin cure and installation records before applying structural loads.
How a chemical anchor transfers load into concrete
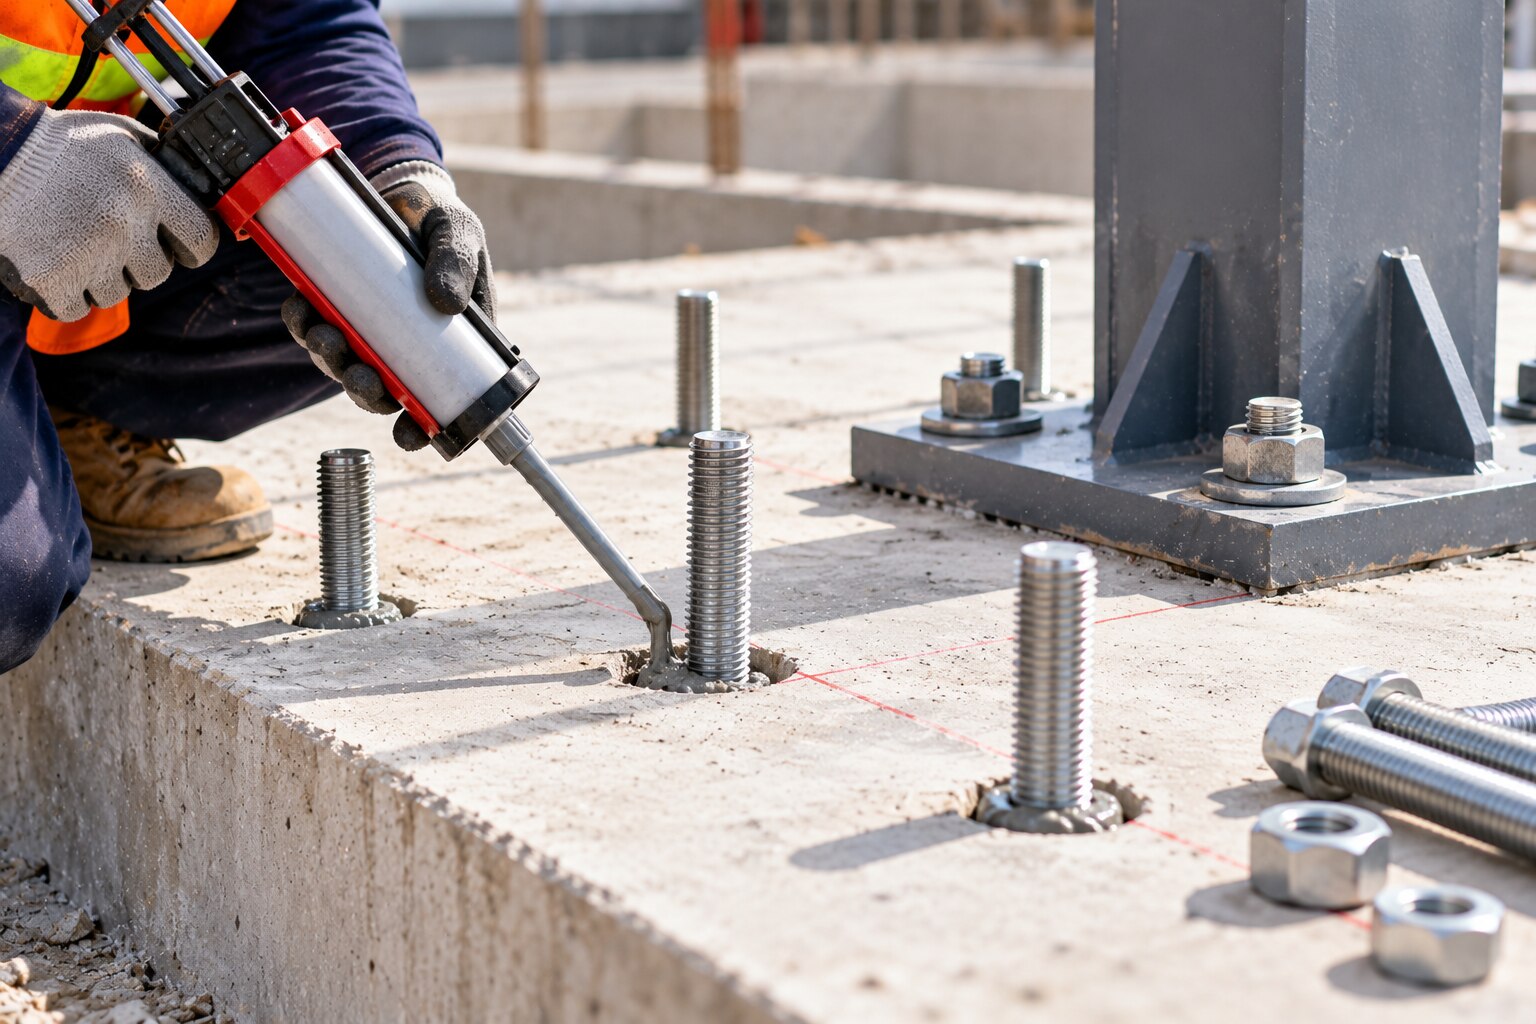
Chemical anchor bolt grouting creates a bonded post-installed anchor inside existing concrete. You drill a designed hole, fill it with a two-component adhesive, and insert a threaded rod or reinforcing bar fixing before the resin cures.
The hardened adhesive grips the steel and bonds to the rough concrete surface, forming a continuous load path from the fixture into the concrete.
- The fixture applies tension or shear to the threaded rod.
- The rod transfers that force into the cured adhesive along its embedment length.
- The adhesive spreads the force into the surrounding concrete through bond and mechanical interlock.
This system supports secure structural fixing because it avoids relying on a wedge expanding against the hole wall. It still requires checks for steel failure, bond failure, concrete cone breakout, splitting, pry-out and edge failure; a larger rod will not solve a weak concrete breakout condition.
A bonded post-installed anchor is not the same as cementitious non-shrink grout beneath a base plate or inside a sleeve. Cement grout fills and supports a gap, while adhesive resin bonds an inserted steel element to the drilled hole. Do not load the anchor before the product’s stated cure time at the measured temperature.
Early torque, vibration or fixture weight can move the rod and permanently reduce its capacity, especially for overhead or horizontal fixing.
How to choose the resin and design the anchor assembly
Choose the adhesive for the exposure, load and installation conditions, not by cartridge price alone. An injectable epoxy suits high structural loads and deep embedment but needs longer curing. Polyester resin is economical for lighter, non-critical fixing.
Vinyl ester offers faster curing and better performance in damp conditions, while a hybrid resin balances cure speed, capacity and temperature tolerance. Confirm each product’s approval for cracked concrete, sustained tension, fire exposure and the measured installation temperature.
| Option | Main trade-off | Select it when |
|---|---|---|
| Injectable epoxy | High bond capacity; slower cure and stricter temperature control | Loads are high and curing time is available |
| Polyester resin | Lower cost; limited suitability for critical or damp applications | The load and product approval permit it |
| Vinyl ester | Fast cure and good moisture tolerance; higher cost | Programme or site conditions demand it |
| Hybrid resin | Balanced capacity, cure speed and tolerance | You need an adaptable general-purpose system |
Match the rod to the tested adhesive assembly. Specify rod diameter, steel grade, effective embedment, hole diameter and depth, washer, nut and installation torque together; changing the drill bit, coating, cartridge, nozzle or rod can invalidate published resistance.
Check every design against:
- Steel tension and shear failure
- Adhesive-to-concrete and adhesive-to-rod bond failure
- Concrete cone breakout and splitting
- Pry-out, edge breakout and group effects in shear
- Spacing, edge distance, cracked-concrete status and sustained load
- Product-specific cure time before torque, steelwork installation or vibration
How to confirm that existing concrete can accept the anchor
Do not select embedment, hole diameter, anchor spacing or edge distance until you establish the member’s condition, thickness and hidden contents. Review structural drawings, expose the concrete where necessary, and verify concrete strength from records or cores rather than assuming the original specification remains accurate.
1. Map visible cracks, spalls, delamination, corrosion staining and previous repairs. Treat cracked concrete as a design condition, then confirm that the anchor’s approval covers cracked concrete, the measured concrete strength and the proposed installation orientation.
2. Measure slab, beam or wall thickness and compare it with the required effective embedment. Insufficient thickness can cause concrete breakout or drilling through the member.
3. Scan for reinforcement, prestressing tendons, conduits and other embedded services using suitable locating equipment. Hitting ordinary reinforcement can damage the structure or force an unapproved relocation; striking a tendon creates a serious safety and structural risk.
4. Mark nearby anchors, openings, joints and free edges. Check anchor spacing and edge distance against the product’s design equations or approval data; do not apply a simple percentage reduction to nominal capacity.
5. Confirm the approved assembly: adhesive cartridge, nozzle, threaded rod grade and coating, drill diameter, hole depth tolerance and installation orientation. A different bit or rod can invalidate the published resistance.
The assessment must also identify the governing failure mode: steel rupture, bond failure, concrete cone breakout, splitting, pry-out or edge failure. A larger rod will not improve capacity when the surrounding concrete or bond governs.
How installation controls protect bond strength
Bond strength is won inside the hole: dust, uncontrolled water and movement during curing create an unbonded zone that can fail before the steel reaches its design resistance.
1. After drilling, perform hole cleaning exactly as the adhesive manufacturer specifies. Use the stated brush diameter and clean, oil-free compressed air for the required cycles; the blow-brush-blow sequence is not optional. A hole that looks clean is not proof that drilling dust has been removed.
2. Confirm the resin’s moisture approval before installation. Some systems accept dry or water-saturated concrete, while others require a dry hole. Water-filled holes can reduce bond strength or invalidate the product approval, and merely removing visible water does not authorise a different procedure.
3. Check concrete and cartridge temperatures against the product data sheet. Cold resin may not mix or cure within the stated time; overheated resin can shorten working time. Keep the cartridge within its specified storage and application range.
4. Fit a new nozzle, discard the initial material until the colour and texture are uniform, then inject from the back of the hole while withdrawing the nozzle. Do not fill from the mouth and push the rod through the adhesive; this traps voids, especially during overhead fixing.
5. Insert the rod with the specified rotation and embedment, then prevent movement, vibration and loading until the full cure time has elapsed. Mark each anchor and record batch number, temperature, installation time and cure release.
How to verify the completed fixing and choose practical support
Do not release structural anchors for service until the design basis, installation record and acceptance test are traceable to each anchor group. For US work, require design under ACI 318 Chapter 17 and an adhesive qualified to ACI 355.4; European work commonly uses the selected product’s ETA and declared performance data.
Require these records before loading:
- Product name, approval or qualification, batch number, expiry date, storage conditions and the manufacturer’s installation instructions.
- Anchor diameter, embedment, spacing, edge distance, hole diameter, concrete condition, resin temperature, cure time and installer sign-off.
- Drill logs showing reinforcement and service scanning, plus photographs or marked drawings where relocation was necessary.
- The engineer’s test plan stating proof loading or pull testing load, direction, sample rate, test age and acceptance limit.
| Evidence | What it establishes | What it cannot establish |
|---|---|---|
| Proof loading | A specified sample withstands the stated load | Every anchor has correct embedment, cleaning and cure |
| Pull testing | Gross defects or a required verification check can be identified | Long-term resistance from a short-term test |
| Visual and installation records | The prescribed materials and sequence were used | Bond capacity without design and testing |
For sustained tension, check the resin’s qualification for permanent loading; a passing short-term test is insufficient for suspended services or façade restraints. Support horizontal and overhead rods until full cure, because vibration or fixture weight can disturb a rod that feels firm.
Choose a contractor that can scan, document, install and test under an engineer’s method statement. Salasar Demolitions Pvt Ltd should be assessed against those records and capabilities, not merely its ability to drill and inject resin.
Related products
 | anchorbolte anchor bolte fixiting with chemical View product → |
 | CHEMICAL ANCHORING & REBAR FIXING Lorem ipsum dolor sit amet, consectetuer adipiscing elit, sed diam nonummy nibh euismod tincidunt ut laoreet dolore magna aliquam erat volutpat. View product → |
Frequently asked questions
How does a chemical anchor transfer load into concrete?
A cured two-component resin bonds the threaded rod or reinforcing bar to the drilled hole, transferring tension and shear into the surrounding concrete through adhesion and mechanical interaction.
How do you choose resin and design the anchor assembly?
Select the resin for the concrete condition, temperature, moisture exposure and design loads, then specify rod diameter, embedment depth, spacing and edge distances as one engineered assembly.
How do you confirm that existing concrete can accept an anchor?
Inspect concrete quality and cracking, locate reinforcement and services, and check thickness, edge distances, spacing and the proposed load path before drilling.
What installation controls protect chemical anchor bond strength?
Use the specified drill diameter and depth, remove dust with the required cleaning sequence, inject resin from the hole base, insert the rod correctly and respect the stated curing time and temperature.
How do you verify a completed chemical anchor fixing?
Record the anchor type, batch details, hole dimensions, cleaning method, embedment and cure conditions, then inspect the installation and perform proof testing when the design or engineer requires it.
Related product
 | foundation foundation bolt fixing with chemicals View product → |